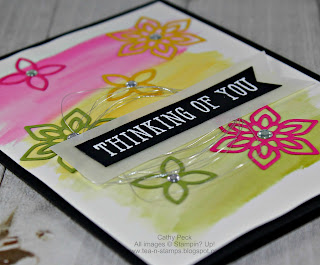
Thursday, June 8, 2017

Dragonfly Dreams Set - Catalog Favorite

Stampin Up introduced Dragonfly Dreams in the Occasions Catalog earlier this year and I was so happy that it was carried over into the 2017-2018 Annual Catalog.  It is one of my favorite stamps and Thinlet Dies.  It is one of those stamp sets that I will keep forever, it is truly timeless.  I made a card set with coordinating tote and donated it to a local business for their 30th anniversary giveaway.


Card Measurements:
 Smoky Slate  base 5 1/2 x 4 1/4
Blushing Bride layer 4 x 5 1/4
Whisper White Layer 3 3/4 x 5
Blushing Bride 4 x4 for Dragonfly


TIP:  I cut a piece of copy paper same size as Whisper White layer to create a mask using the Layering Ovals Framelits.   I used Smoky Slate, Blushing Bride and Pink Pirouette to create the background with the Timeless Textures stamp set.  To learn more about this technique check out this video on You Tube.   Thanks to Kim Williams inspiration for this card and a great video tutorial.


Product List
Dragonfly Dreams Photopolymer Stamp Set
$21.00
Detailed Dragonfly Thinlits Dies
$31.00
Timeless Textures Clear-Mount Stamp Set
$20.00


Coordinating Tote


This tote was designed by LeeAnn Greff and her instruction video has been up on You Tube since August 2015.  It is so easy to make, this is my third one and it is a perfect tote for my cards.  The cardstock is Rich Razzleberry, the DSP and Brads are retired, the sentiment is from a past Paper Pumpkin kit.  I have seen this tote decorated so may ways on Pinterest, it is so versatile.  Just jump in and make one today!!


Thanks for stopping by my blog, Tea and Stamps, today. I hope you enjoyed viewing my project featuring the fantastic Dragonfly Dreams Stamps and Detailed Dragonfly Thinlets.

Don't hesitate to contact me by leaving a comment below or e-mail at texdelch@hotmail.com if you want to learn more this project. You can also "Follow by Email" or become one of my "Followers" to keep up with my latest creations.


Cathy Peck
Wichita Falls, TX
texdelch@Hotmail.com

Wednesday, June 7, 2017

DOStamper STARs Thursday Challenge #234: 2017-2018 In Colors

Welcome to this weeks DOStamper Stars Thursday Color Challenge #234. This week we are having a "Product Spotlight" Challenge featuring the new 2017-2018 In Colors.  I love these new colors, especially the Tranquil Tide and Powder Pink.  I managed to get all 5 colors in cardstock and ink onto my card.  The Falling Flowers stamps and May Flowers Framelits are the perfect set for these colors, I love them all together in this card.  Hope you like it as well!!

 
Card Measurements:
 Tranquil Tide  base 5 1/2 x 4 1/4
Irresistibly Floral (retired) DSP layer 4 x 2 3/4
Powder Pink 3 x 3
Berry Burst 3 x 3
Lemon Lime Twist 4 x 4
Fresh Fig 2x2
Sentiment strip Whisper White 1 x 5


TIP:  Use a piece of Washi tape to hold the framelit in place if your do not have the magnet base plate for your Big Shot.  That is what I do.  Works great and does not tear up my cardstock. 


Thanks for stopping by my blog, Tea and Stamps, today. I hope you enjoyed viewing my project featuring the new 2017-2018 In-Colors.  Which one is your new favorite? 

Don't hesitate to contact me by leaving a comment below or e-mail at texdelch@hotmail.com if you want to learn more this project. You can also "Follow by Email" or become one of my "Followers" to keep up with my latest creations.

Product List


Enjoy!!

Cathy Peck
Wichita Falls, TX
texdelch@Hotmail.com

Friday, June 2, 2017

New Catalog - Deligthful Daisy Suite

It's that time of year when Stampin Up releases it's new annual catalog.  One of my favorites in this new catalog is the Delightful Daisy Suite.  It is an absolutely beautiful set.  The Designer Series Paper is just beautiful.  I am going to love creating with this set for a long time.  Here is my first creation with this set, I made 13 cards for a swap--of course I made a few extra for me.

 
Card Measurements:
 
 Old Olive base 5 1/2 x 4 1/4
Wisteria Wonder layer 5 1/2 x 2 3/4
Delightful Daisy DSP 5 1/2 x 2 1/2
Sentiment strip 3/8 x 5 (See tip)
Daffodil Delight 3 x 3 ( two pieces)
Old Olive scrap for leaves


TIP:  Use Classic Label punch to create sentiment strip.  Stamp sentiment on 3/8 inch strip and then punch each end one side at a time going through top of punch as pictured below.


Thanks for stopping by my blog, Tea and Stamps, today. I hope you enjoyed viewing my project featuring the new Delightful Daisy Suite.  Don't hesitate to contact me by leaving a comment below or e-mail at texdelch@hotmail.com if you want to learn more this project.  You can also "Follow by Email" or become one of my "Followers" to keep up with my latest creations.


Product List

Cathy Peck
Wichita Falls, TX
texdelch@Hotmail.com

Monday, May 29, 2017

FMS #289 - A Sara Thing (Paper Pumpkin)

Happy Memorial Day!!  It is a glorious day in North Texas to reflect on the service members that were willing and remain willing to sacrifice themselves for the safety and security of others. 
Thank-you!!

Today I am playing with the latest Freshly Made Sketches challenge #289.  Once I saw the sketch I knew I had to pull out my April Paper Pumpkin kit, A Sara Thing.  Here is what I came up with today.  This is another color wash card similar to my last post,  this time I used Stampin Up Watercolor Pencils and a wet brush. With the exception of a few embellishments everything I needed to create this card was included in the Paper Pumpkin kit.  How cool is that?


Card Measurements
 
Basic Black base 5 1/2 x 4 1/4
Whisper White layer 5 1/4 x 4
DSP and Watercolor layer 3 x 3


TIP: To add subtle splashes of color to my water colored background I dipped the brush in water and then added pigment directly from watercolor pencil to brush.  Then I flicked the bristles with my finger to achieve the desired look.  Here is a close up photo.


Thanks for stopping by my blog, Tea and Stamps, today. I hope you enjoyed viewing my project featuring A Sara Thing Paper Pumpkin kit.  Paper Pumpkin kits are a great way to get crafty without having to spend lots of money.  Each kit contains all you need to complete each project.  Currently Stampin UP is offering a 25% discount on a 3-month subscription for new enrollees.  Now is a great time to give Paper Pumpkin a try. If you would like learn more about Paper Pumpkin leave me a comment or drop me an e-mail at texdelch@hotmail.com.  You can also "Follow by Email" or become one of my "Followers" to keep up with my latest creations.

 
Product List


Cathy Peck
Wichita Falls, TX
texdelch@Hotmail.com

Sunday, May 28, 2017

3-D Sunday: Happy Birthday Treat Box

Happy Sunday!! Today I am sharing a quick and simple 3D treat box that is perfect for any occasion.  I made this one for an upcoming birthday.  It would also make a great hostess gift or just a little something for a special friend.  I like to fill my with candy and a bit of cash on the bottom.  That makes for a great surprise.  Who doesn't like a little cash on their birthday.


Measurements:
Cardstock for box – 4 x 9 inches
Score All sides at 1 inch
On SHORT side score at 4, 5  inches
Designer Series Paper – 1 7/8 x 2 7/8
two pieces at 7/8 x 2 7/8
one piece at 7/8 x 1 7/8 
Scrap of Whisper White for sentiment
12 inches of ribbon or twine


TIP: To make a longer box add 1 or 2 inches to cardstock length.  Score at 1 inch all on all sides around. Locate SHORT side center and score to 1/2 inch to the left and right of center.  Adjust DSP sizes accordingly.  This is a great way to use up retired card stock and DSP. 


Thanks for stopping by my blog, Tea and Stamps, today. I hope you enjoyed viewing my project featuring Happy Birthday Treat Box inspired by Sam Hammonds.  It is easy to adjusted the sizes to make a box that will fit your needs.  If you would like learn more about the technique I used to make these boxes leave me a comment and you can also "Follow by Email" or become one of my "Followers" to keep up with my latest creations. 
Product List

Enjoy your Memorial Day weekend!!

Cathy Peck
Wichita Falls, TX
texdelch@Hotmail.com

Wednesday, May 24, 2017

DOStamper STARs Thursday Challenge #232: Flourish Thinlets Color Wash

Welcome to this weeks DOStamper Stars Thursday Color Challenge #232. This week we are having a "Color My World" Challenge highlighting Melon Mambo, Old Olive and Crushed Curry. I used the three ink colors to create a color wash on my card layer and added die cut flowers using the Flourish Thinlits in coordinating cardstock colors. I think it is a lovely card.


Card Measurements: 
 
Basic Black base 5 1/2 x 4 1/4
Shimmery White layer 5 1/4 x 4
Vellum strip 1 x 4
Basic Black sentiment strip 5/8 x 3 1/2


Tip: Pinterest has several video examples of the Color Wash technique, I suggest you go there and find the technique that works best for you.  I took ink directly from ink pad and onto the paper with my aqua painter, making sure my aqua painter was not overly wet.  Shimmery White or Watercolor paper works best for this technique. Once I had the right amount of ink on the paper I let it dry for a bit and then flattened under a heavy book.

Thanks for stopping by my blog, Tea and Stamps, today. I hope you enjoyed viewing my project featuring Flourish Thinlets die with a color wash background.  If you would like learn more about the technique I used leave me a comment and you can also "Follow by Email"  or  become one of my "Followers" to keep up with my latest creations. 

Product List


Cathy Peck
Wichita Falls, TX
texdelch@Hotmail.com

Monday, April 24, 2017

FMS 284 - Dragonfly Dreams

It has been ages since I joined a Freshly Made Sketches challenge #284  This week I could not resist and I had make this card using the masking technique.  So easy to do and it add a unique background to the card. 


  • Start with Whisper White card base 4 1/4 x 5 1/2 
  • Layers Basic Black 4 1/8 x 5 3/8, Whisper White 4 x 5 1/4
  • Mask off center of  Whisper White layer & fill in with Smoky Slate ink using sponge brayer
  • Stamp random images from Timeless Textures & Awesomely Artistic sets in Basic Gray ink  
  • Die cut  2 dragonflies from the Detailed Dragonfly Thinlets set & cover with Wink of Stella  
  • Added a Metallic Enamel Shapes for interest
  • Adhere layers & attach to card base
  • Due to the size of the dragonflies I choose not to add a sentiment as per the sketch 
I chose the colors Basic Black, Basic Gray and Smoky Slate so I can present this card on the current Color Your World FaceBook page challenge.  Wild colors to pick for springtime. 

Product List


ENJOY SHOPPING AND LOVE BARGAINS? No worries, my store is open 24/7!
- Check out the Retiring Products here.
- Browse Holiday Carryover Products here.
- Check out how you can save more on Stampin' Up! bundles here!
- Take a peek at the Occasions Catalog Products, closes out 31 May 2017. 
- Visit the Stampin' Up! Clearance Rack for up to 60% off clearance items.
- Want the BEST BARGAIN OF ALL? The Ultimate Bundle?
  •  Join my Stampin' Up! team
  • Your choice of up to $125 of current Stampin' Up!! products for only $99
  • No obligation to recruit or sell
  • Minimum of 20% discount on all purchases
Don't hesitate to contact me if you have any questions.  Start your creative journey here for just $99.  I would love to go on that journey with you.

 
Enjoy!!

CJ
 

Stamping With Friends Blog Hop - Saying Goodbye to the 2022-2024 In Colors

Hey my crafty friends!! Today I am saying goodbye to my most favorite In Color group the 2022-2024 In Colors.  There is a lot to...